Preface
After Blog Building From Scratch (1) Resouces : VM, and Domain, in this part we will build a https server.
HTTP Server
We mentioned before that When we browse a website, we will send a request to a machine (server), and the server will response with some data which will display in the browser. The requset and response have certain format, and the protocal we use is called HTTP.
So we need to build a http server in the vm we applied when we prepare the resources.
There are many application to build a http server. As for a blog server, there are WordPress, Hugo, Hexo and so on. These application can run a http server in vm, and it can help set up proper theme and a bounch of things for SEO (search engine optimization).
But it is not my choice. I want to build a blog from scratch, and try to build it from scratch by myself rather than with a blog application.
So we will started by run a basic http server with nginx.
Nginx
Nginx is a very popular http server, it can be used as http server and proxy the request to other application like below.
Client —>(send request)—> vm(nginx) —>(proxy to)—> vm(other application)
And nginx can be a http server itself. So we will use ngnix as a basic http server to check if out resources works well.
First we need to install ngnix.
|
|
After install, we will configurate nginx.
|
|
And then reload config.
|
|
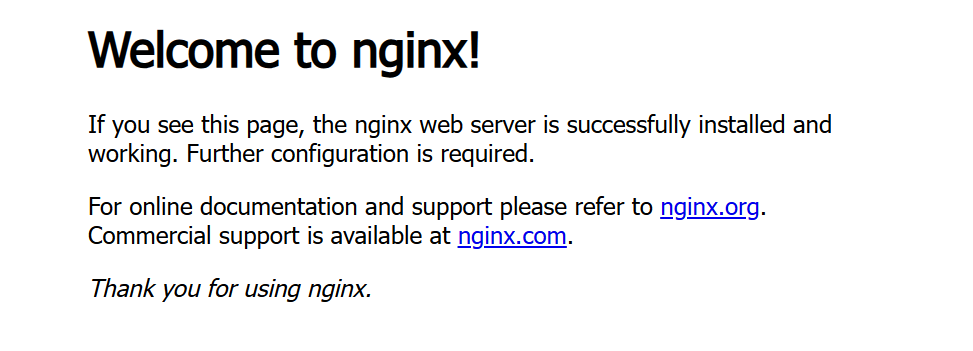
In this way, we shall open a browse and goto the domain we just configurated, like “http://your_domain.com”, pay attention that it is a http website not https website, beacuse http website is using port 80 without SSL and https website is using port 443 with SSL, and we will discuss https server later. We will find nginx is serving in that domain like below.
HTTPS Server
HTTPS is a advanced version of HTTP. S means secure. How does https become secure. The main difference is that a https server uses encryption to ensure that data exchanged between a user’s browser and a website remains private and secure.
Cause https secure process is complicated, we will leave that part to Google or Chatgpt. We will focus on how to build a https server with Ngnix.
What is most important is to get a certifate of the domain. The logic is to improve we own the domain to some Certificate Authority (CA), and they will sign a certificate to us. And we add the certificate to our ngnix, so others will believe the server is the trusted owner for the domain.
We can use acme.sh to get certificate. Before that we must delete nginx config we just add, because when apply for certificate, acme.sh will use port 80.
|
|
Former steps install acme.sh, apply and install the certificate into /usr/local/etc/v2ray. And then we shall alter the configurate of ngnix.
|
|
We can test it in browser going to the domian. We will find that the connection is secured like below.
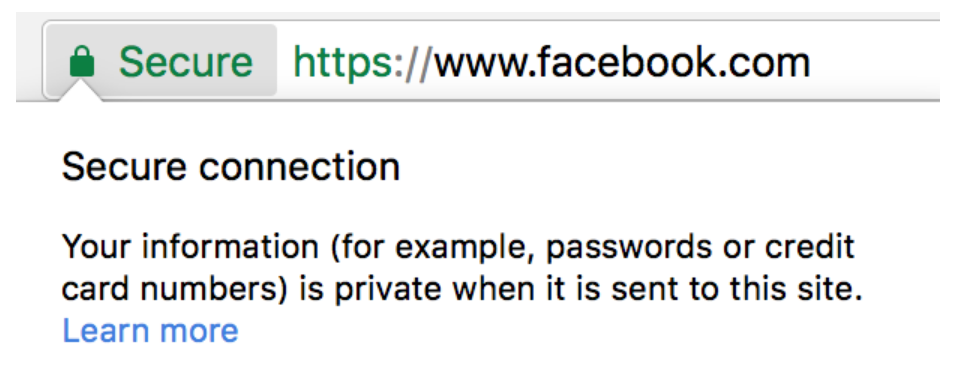
So when client transmit data with nginx, the data will be secured. It is the benefit of using ngnix. Ngnix can handle certificate process and build https connection with client. Then nginx proxy http request to other internal application in vm. So other application do not need to consider certificate things.
Summary
In this part, we build a https server with nginx. In next part Blog Building From Zero (3) Blog Server : Nodejs, React and Golang we will build application as a blog server, which will handle the http request proxied from nginx.